
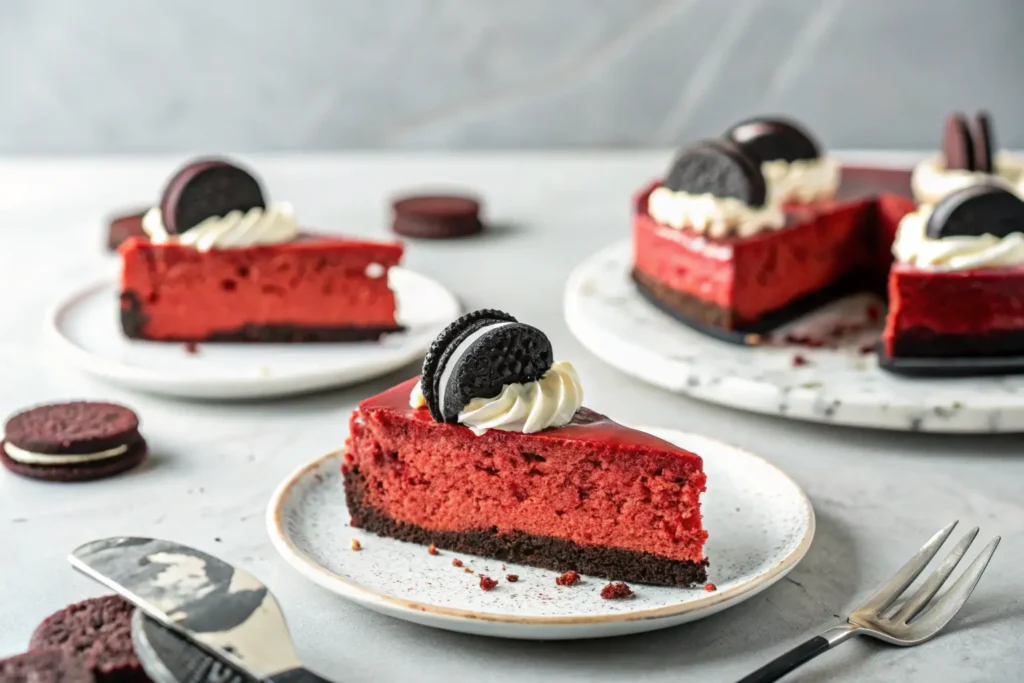
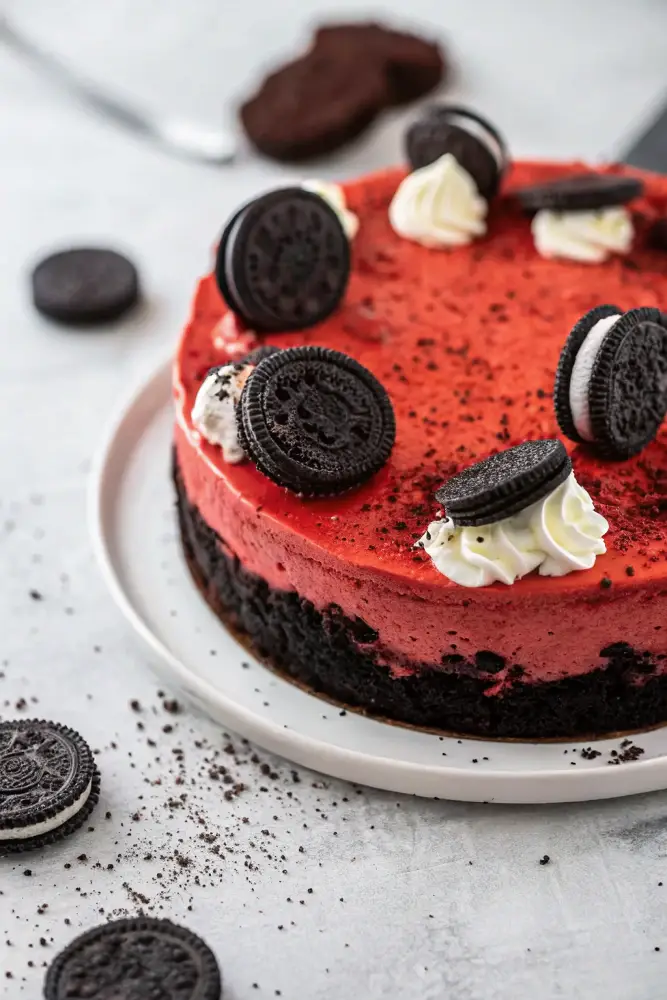
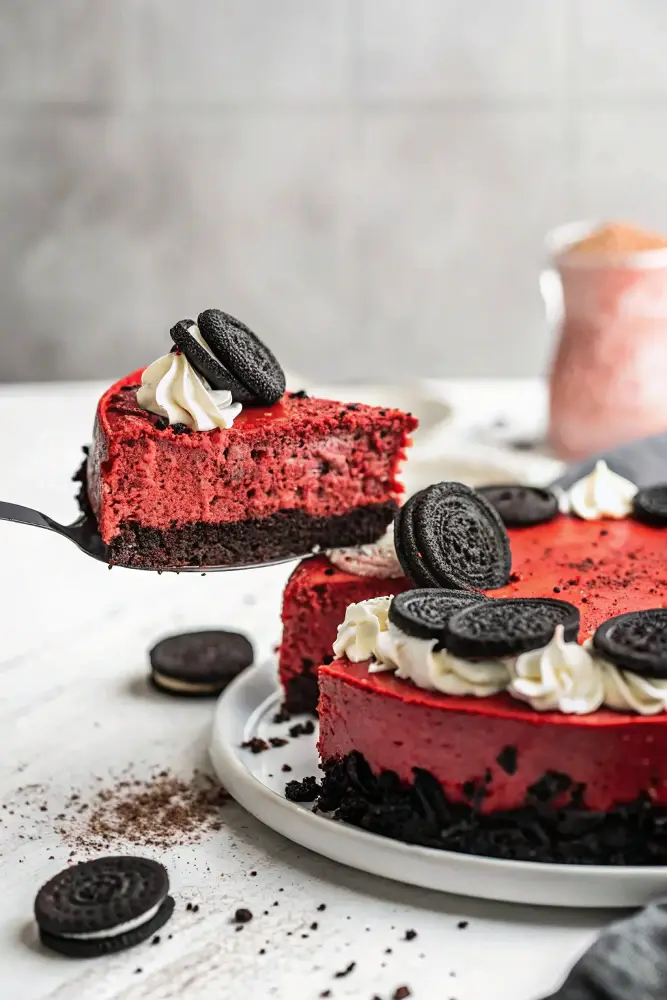
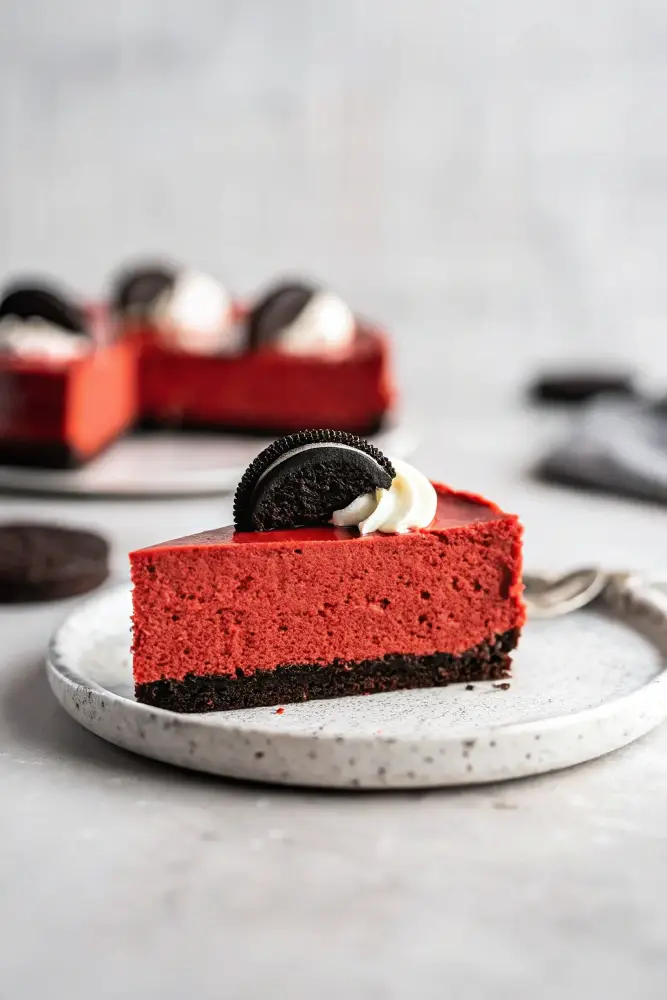
Alright, let’s talk about red velvet cheesecake—aka the dessert that makes people weak in the knees. It’s rich, creamy, slightly tangy, and has that classic red velvet vibe we all know and love. Plus, it’s a total showstopper. Whether you’re making it for a holiday, a birthday, or just because you need something sweet (same), this cheesecake will win over any crowd.
And hey, if you’re thinking, “Isn’t cheesecake kinda hard to make?”—don’t sweat it. I’m breaking this down so even if you’ve never baked a day in your life, you can pull this off like a pro.
What Makes Red Velvet Cheesecake So Special?
Let’s be real—cheesecake is already pretty amazing on its own. But red velvet cheesecake takes it up a notch with:
- That classic red velvet color – It’s vibrant, bold, and just screams special occasion.
- The perfect balance of flavors – A little tangy, a little chocolaty, and totally dreamy.
- A thick, buttery crust – Because every good cheesecake deserves an epic base.
- That creamy, melt-in-your-mouth texture – The kind that makes you close your eyes with every bite.
Plus, let’s not forget the cream cheese frosting. If you thought cheesecake couldn’t get better, just wait until you slather some of that goodness on top.

Ingredients You’ll Need
Before we jump into the recipe, let’s do a quick grocery run (or kitchen check). Here’s what you’ll need:
For the Crust:
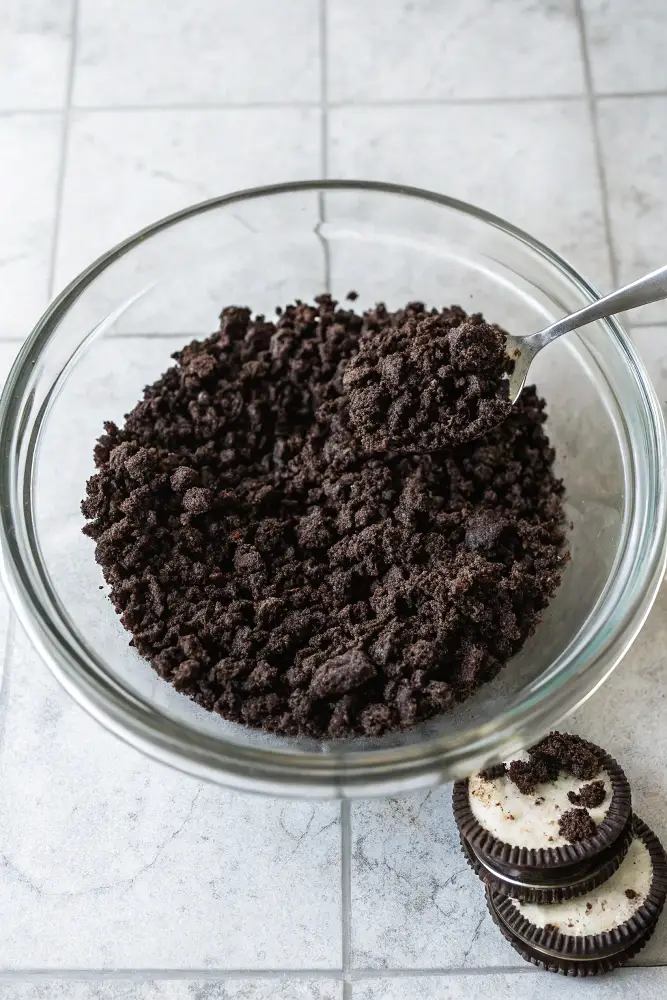
- 2 cups crushed Oreo cookies (or graham crackers, if you prefer)
- 5 tbsp unsalted butter, melted
- 2 tbsp sugar
For the Cheesecake Filling:
- 24 oz (3 packages) cream cheese, softened
- 1 cup granulated sugar
- 3 large eggs
- 1 cup sour cream
- 1 tbsp vanilla extract
- 1 tbsp cocoa powder
- 1 tbsp white vinegar
- 2 tsp red food coloring
For the Cream Cheese Frosting (Optional, But Highly Recommended!):
- 4 oz cream cheese, softened
- 2 tbsp butter, softened
- 1 cup powdered sugar
- 1 tsp vanilla extract
Got everything? Great. Let’s get baking!
How to Make Red Velvet Cheesecake
1: Make the Crust
- Preheat your oven to 325°F (163°C).
- Crush the Oreos into fine crumbs (a food processor makes this easy, but a ziplock bag and rolling pin work too).
- Mix the cookie crumbs with melted butter and sugar until everything is coated.
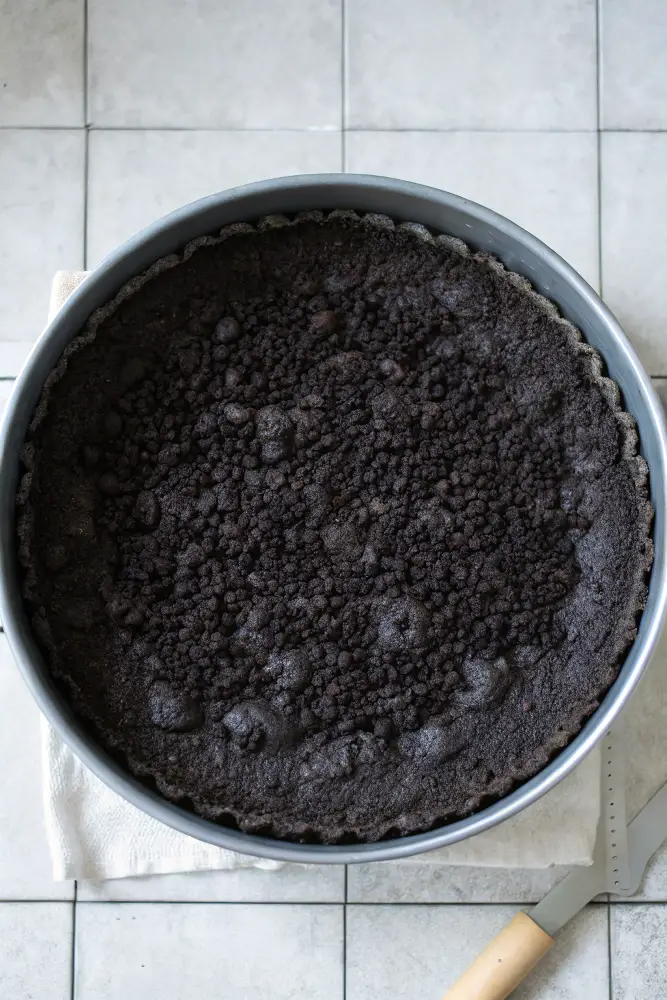
- Press the mixture firmly into the bottom of a 9-inch springform pan.
- Bake for 10 minutes, then let it cool while you work on the filling.
2: Make the Cheesecake Batter
- Beat the cream cheese and sugar together until smooth.
- Add the eggs, one at a time, mixing well after each.
- Stir in the sour cream, vanilla, cocoa powder, and vinegar.
- Add the red food coloring—start with 2 teaspoons and adjust until you get that deep red color.
3: Bake the Cheesecake
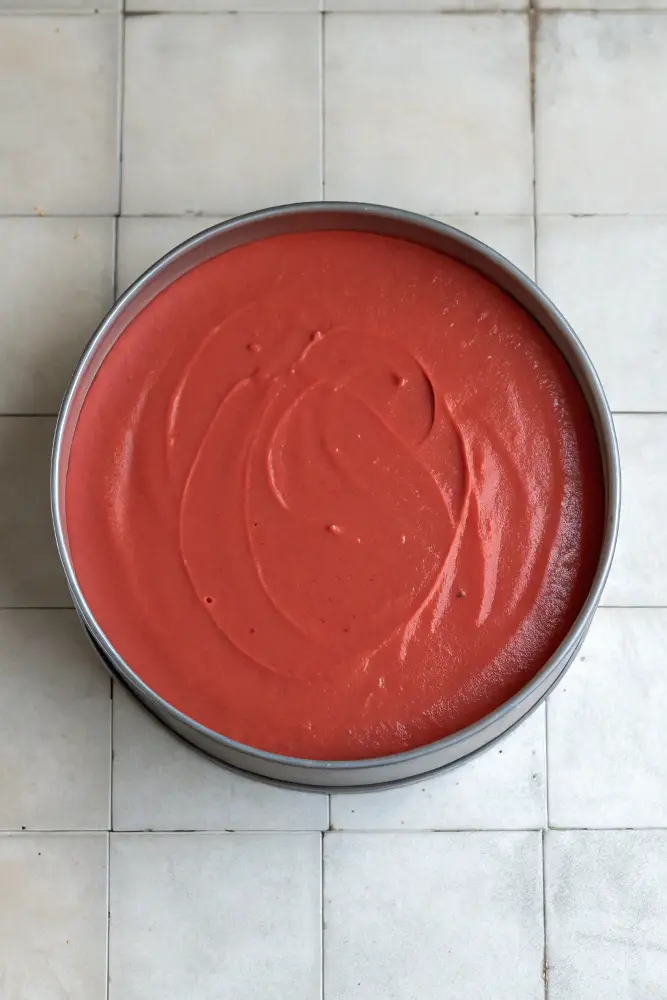
- Pour the batter over the cooled crust.
- Water bath method (optional but recommended!): Wrap the bottom of the pan in foil, place it in a larger baking dish, and add hot water halfway up the sides. This helps prevent cracks.
- Bake for 55-60 minutes, or until the center is slightly jiggly but the edges are set.
- Turn off the oven and let the cheesecake sit inside with the door slightly open for an hour (this helps prevent sinking and cracking).
4: Chill & Frost
- Refrigerate the cheesecake for at least 4 hours (overnight is even better).
- Once chilled, beat the cream cheese frosting ingredients together and spread a layer on top.
- Optional: Add chocolate shavings, red velvet cake crumbs, or fresh berries for extra flair.
And just like that, you’ve got yourself a stunning red velvet cheesecake that looks like it came straight from a bakery.
Tips for the Best Red Velvet Cheesecake
- Use room-temperature ingredients. This helps everything mix smoothly without lumps.
- Don’t overmix the batter. Too much air can cause the cheesecake to crack.
- Bake low and slow. High temps can make cheesecake dry and dense.
- Let it cool gradually. Sudden temperature changes can cause cracks.
Follow these tips, and you’ll make the best red velvet cheesecake ever!
What to Serve with Red Velvet Cheesecake
This dessert is already a showstopper, but pairing it with the right drink or side can make it even better. Here are some fun pairings:
- Coffee or espresso – The bitterness balances the sweetness of red velvet cheesecake perfectly.
- Red wine – A light pinot noir or a slightly sweet red pairs well with the creamy texture.
- Fresh berries – Raspberries, strawberries, or blueberries add a fresh contrast.
- A scoop of vanilla ice cream – Because why not? The cold, creamy bite alongside cheesecake is a match made in dessert heaven.
Delicious Variations of Red Velvet Cheesecake You Need to Try
If you love red velvet cheesecake, why not switch things up? Here are some fun twists on the classic:
- Chocolate Swirl Red Velvet Cheesecake – Swirl in melted chocolate for a rich, marbled look.
- Red Velvet Cheesecake Cupcakes – Perfectly portioned mini cheesecakes in cupcake liners.
- No-Bake Red Velvet Cheesecake – Skip the oven and chill for a smooth, creamy dessert.
- Red Velvet Cheesecake Bars – Bake in a square pan and cut into snackable squares.
- Red Velvet Cheesecake Donuts – Soft red velvet donuts stuffed with cheesecake filling.
- Red Velvet Cheesecake Ice Cream – A frozen treat with swirls of cheesecake and cake bits.
- Red Velvet Cheesecake Bread – A moist red velvet loaf with a sweet cheesecake swirl.
- Red Velvet Cake Cookies – If you love cookies, try Red Velvet Cake Cookies for a chewy, chocolatey twist!
My First Red Velvet Cheesecake Experience
I’ll never forget the first time I made red velvet cheesecake. It was a random weekend, and I was in the mood for something sweet. I had made cheesecake before, but combining it with red velvet was a whole new level of delicious. The first bite was like pure bliss—the creamy texture, the slight cocoa flavor, and that vibrant red color. Honestly, it was so good, I ate half the cheesecake in one sitting. It’s safe to say I’ve been hooked ever since!
What Makes Red Velvet Cheesecake Different from Regular Cheesecake?
If you’ve ever had a classic New York-style cheesecake, you know it’s all about that rich, creamy texture. But red velvet cheesecake brings something extra to the table. Unlike plain cheesecake, this version has a hint of cocoa, a slight tang from vinegar, and a striking red color that makes it feel fancier. It’s basically the perfect blend of cheesecake and red velvet cake—two iconic desserts coming together in one dreamy bite.
Another key difference? The crust. While traditional cheesecakes usually have a graham cracker base, this one often features crushed Oreos or chocolate cookies. The chocolatey crunch pairs beautifully with the velvety smooth filling, making every bite a textural masterpiece.
Can You Turn Red Velvet Cheesecake into a Layered Cake?
Oh, absolutely! If you want to take things up a notch, try making a red velvet cheesecake layer cake. Instead of baking just a cheesecake, you can sandwich it between layers of red velvet cake and frost it with cream cheese frosting. The result? A jaw-dropping dessert that looks like it belongs in a bakery display.
To do this:
- Bake your red velvet cheesecake as usual and let it chill completely.
- Bake two red velvet cake layers and let them cool.
- Stack them: Cake layer → Cheesecake layer → Cake layer.
- Frost the entire thing with cream cheese frosting.
This version is perfect for birthdays, weddings, or any celebration where you want to wow your guests.
Can You Make Red Velvet Cheesecake Bars?
Not in the mood for a full cheesecake? Try making red velvet cheesecake bars instead. They’re easier to slice and serve, making them perfect for parties, bake sales, or just casual snacking.
Here’s how:
- Use the same crust and filling recipe, but bake it in a 9×13-inch pan instead of a springform pan.
- Bake for about 35-40 minutes instead of an hour.
- Chill, slice into squares, and enjoy!
Bonus tip: Swirl some cream cheese frosting on top before serving for an extra delicious touch.
Can You Make a No-Bake Red Velvet Cheesecake?
Absolutely! If you don’t feel like turning on the oven, a no-bake red velvet cheesecake is a great alternative. It still has that signature flavor, but it’s lighter and airier since it sets in the fridge instead of baking.
To make a no-bake version:
- Prepare the Oreo crust, then chill it in the fridge.
- Beat cream cheese, sugar, cocoa powder, vanilla, red food coloring, and whipped cream until smooth.
- Spread it over the crust and refrigerate for at least 6 hours (overnight is best).
- Top with whipped cream or cream cheese frosting before serving.
This version is great for summer when you don’t want to heat up the kitchen but still crave something rich and indulgent.
The Best Occasions for Red Velvet Cheesecake
Let’s be real—you don’t need a special occasion to eat red velvet cheesecake. But if you’re looking for an excuse, here are a few perfect times to whip one up:
- Valentine’s Day – Nothing says “I love you” like a homemade red velvet dessert.
- Christmas – The red and white color combo fits the holiday theme perfectly.
- Birthdays – Because cake is great, but cheesecake? Even better.
- Weddings & Anniversaries – Elegant, rich, and perfect for a special day.
- Brunch with Friends – Cheesecake for brunch? Absolutely.
Honestly, whether it’s a fancy celebration or a random Tuesday night, red velvet cheesecake is always a good idea.
Red Velvet Cheesecake vs. Red Velvet Cake: Which One Wins?
This is THE debate for red velvet lovers. Both desserts have that classic red color and light cocoa flavor, but they’re totally different in texture. Red velvet cake is light, fluffy, and layered with cream cheese frosting, while red velvet cheesecake is dense, creamy, and ultra-rich.
So which one’s better? It depends on your mood. If you want something soft and airy, go for cake. If you want a thick, decadent bite that melts in your mouth, cheesecake is the way to go.
But honestly… why choose? Make both and have the best of both worlds!
FAQs About Red Velvet Cheesecake
What Does Red Velvet Cheesecake Taste Like?
Red velvet cheesecake is a delicious fusion of two iconic desserts. The cheesecake filling is creamy and tangy, balanced with a slight sweetness. The red velvet base gives it a rich, subtle cocoa flavor, without being overly chocolatey. The combo of creamy, tangy, and a little cocoa makes each bite decadent and indulgent—it’s basically the best of both worlds, smooth and rich with a perfect touch of flavor.
Does Red Velvet Cheesecake Need to Be Refrigerated?
Yes, red velvet cheesecake needs to be refrigerated. Cheesecake is made with dairy products like cream cheese and sour cream, so it should be kept chilled to prevent it from spoiling. After baking, you’ll want to let it cool to room temperature before sticking it in the fridge. Always store it in the refrigerator until you’re ready to serve—this helps it stay fresh and firm.
Does Cheesecake Need to Be Covered?
Absolutely! Cheesecake should be covered when it’s in the fridge. If you leave it uncovered, it can dry out, absorb smells from other foods in the fridge, or even develop a weird crust. For the best results, wrap it tightly with plastic wrap or cover it with a cake dome. This will keep your cheesecake fresh and protected from any unwanted fridge flavors!
How Long Will a Red Velvet Cheesecake Stay Fresh?
If stored properly in the fridge, red velvet cheesecake will stay fresh for about 4-5 days. Just make sure it’s tightly covered. If you’re looking to keep it longer, you can freeze it for up to 3 months—just wrap it up well to prevent freezer burn. When ready to eat, let it thaw in the fridge for a few hours for the best texture and flavor.
Why You Need This Cheesecake in Your Life
If you love red velvet cake and cheesecake, this is THE dessert for you. It’s decadent, velvety smooth, and guaranteed to impress. Whether you’re baking for a special occasion or just treating yourself (because why not?), this red velvet cheesecake will hit the spot every time.
So, grab your mixing bowl and let’s make something delicious. And if you try this recipe, let me know how it turns out!
PrintRed Velvet Cheesecake

red velvet cheesecake—aka the dessert that makes people weak in the knees. It’s rich, creamy, slightly tangy, and has that classic red velvet vibe we all know and love.
- Prep Time: 20 minutes
- chilling time: 4 hours
- Cook Time: 1 hour
- Total Time: 5 hours 20 minutes
- Yield: 12 servings 1x
- Category: Dessert
- Method: Baking
- Cuisine: American
- Diet: Vegetarian
Ingredients
For the Crust:
- 2 cups crushed Oreo cookies (or graham crackers, if you prefer)
- 5 tbsp unsalted butter, melted
- 2 tbsp sugar
For the Cheesecake Filling:
- 24 oz (3 packages) cream cheese, softened
- 1 cup granulated sugar
- 3 large eggs
- 1 cup sour cream
- 1 tbsp vanilla extract
- 1 tbsp cocoa powder
- 1 tbsp white vinegar
- 2 tsp red food coloring
For the Cream Cheese Frosting (Optional, But Highly Recommended!):
- 4 oz cream cheese, softened
- 2 tbsp butter, softened
- 1 cup powdered sugar
- 1 tsp vanilla extract
Instructions
1: Make the Crust
- Preheat your oven to 325°F (163°C).
- Crush the Oreos into fine crumbs (a food processor makes this easy, but a ziplock bag and rolling pin work too).
- Mix the cookie crumbs with melted butter and sugar until everything is coated.
- Press the mixture firmly into the bottom of a 9-inch springform pan.
- Bake for 10 minutes, then let it cool while you work on the filling.
2: Make the Cheesecake Batter
- Beat the cream cheese and sugar together until smooth.
- Add the eggs, one at a time, mixing well after each.
- Stir in the sour cream, vanilla, cocoa powder, and vinegar.
- Add the red food coloring—start with 2 teaspoons and adjust until you get that deep red color.
3: Bake the Cheesecake
- Pour the batter over the cooled crust.
- Water bath method (optional but recommended!): Wrap the bottom of the pan in foil, place it in a larger baking dish, and add hot water halfway up the sides. This helps prevent cracks.
- Bake for 55-60 minutes, or until the center is slightly jiggly but the edges are set.
- Turn off the oven and let the cheesecake sit inside with the door slightly open for an hour (this helps prevent sinking and cracking).
4: Chill & Frost
- Refrigerate the cheesecake for at least 4 hours (overnight is even better).
- Once chilled, beat the cream cheese frosting ingredients together and spread a layer on top.
- Optional: Add chocolate shavings, red velvet cake crumbs, or fresh berries for extra flair.
And just like that, you’ve got yourself a stunning
Notes
- Use room-temperature ingredients. This helps everything mix smoothly without lumps.
- Don’t overmix the batter. Too much air can cause the cheesecake to crack.
- Bake low and slow. High temps can make cheesecake dry and dense.
- Let it cool gradually. Sudden temperature changes can cause cracks.
Follow these tips, and you’ll make the best red velvet cheesecake ever!
Nutrition
- Calories: 450
- Sugar: 35g
- Fat: 27g
- Carbohydrates: 45g
- Protein: 7g
Keywords: Red Velvet Cheesecake, Red velvet cheesecake recipe
2 thoughts on “Red Velvet Cheesecake”